How to Wear Gold Threader Earrings: A Step-by-Step Guide
Learn how to insert, style, and secure gold threader earrings with our step-by-step guide. Expert tips on gauges, lengths, and preventing loss.


Gold threader earrings are the epitome of minimalist elegance, offering a delicate, customizable dangle that moves beautifully with you. However, their unique design—a fine chain that pulls directly through the piercing—makes them notoriously tricky to insert, style, and keep secure. If you have ever spent ten minutes fumbling with a chain or lost a threader to a pesky sweater, you are not alone.
This comprehensive, step-by-step guide will teach you the exact mechanics of inserting, sizing, and securing gold threader earrings, ensuring you can wear this sophisticated style with absolute confidence.
Understanding the Anatomy of Gold Threaders
Before attempting to insert your jewelry, it is crucial to understand its three distinct components. Unlike standard post earrings, threaders rely on tension and gravity rather than a friction back.
- The Pilot Tip (or Spear): This is the rigid, tapered metal piece at the front of the chain. It acts as a needle to guide the flexible chain through the fistula (the piercing hole).
- The Chain: Usually a cable, box, or snake chain. For high-quality pieces, this should be solid 14k or 18k gold. Avoid gold vermeil threaders, as the friction of pulling the chain through the ear can quickly wear away the thin gold plating over a sterling silver core.
- The Drop/Charm: The decorative element at the opposite end of the chain that rests below the earlobe.
Step-by-Step Guide to Painless Insertion
The most common failure mode when wearing threaders is forcing the chain, which can cause micro-tears in the piercing channel. Follow this precise method for a smooth insertion.
Step 1: Sanitize and Lubricate
Wipe the pilot tip and the first inch of the chain with a sterile alcohol prep pad. If your piercing is tight or newly healed (though threaders should only be worn in fully healed lobes), apply a microscopic amount of sterile saline or jojoba oil to the pilot tip to reduce friction.
Step 2: The Pinch and Glide Technique
Hold the pilot tip between your thumb and index finger. With your other hand, gently pinch the chain about two inches behind the tip to keep it taut. Align the tip with your piercing hole and push straight through. Do not wiggle or bend the chain while the pilot tip is inside the fistula.
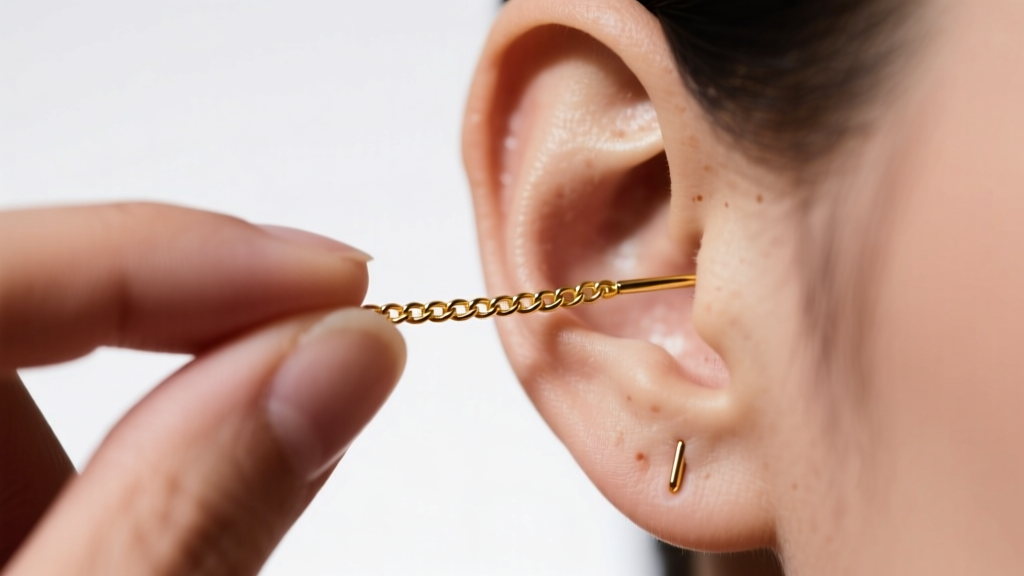
Step 3: Pulling the Chain Through
Once the pilot tip emerges from the back of your earlobe, grasp it gently and pull the chain through until the drop rests at your desired length. Never pull by the delicate drop charm itself; always pull by the pilot tip or the bare chain to prevent bending the jump rings.
Sizing and Gauge: Matching Chain to Piercing
One of the most overlooked aspects of buying gold threader earrings is chain thickness relative to your piercing gauge. Standard lobe piercings are typically done at 20-gauge (0.81mm) or 18-gauge (1.02mm). If your threader chain is thicker than your fistula, it will drag, causing irritation and potential embedding.
| Chain Thickness | Approximate Gauge | Best Piercing Type | Common Chain Style |
|---|---|---|---|
| 0.60mm | 22-Gauge | Tight or older healed lobes | Fine Cable Chain |
| 0.80mm | 20-Gauge | Standard healed lobe piercings | Box or Snake Chain |
| 1.00mm+ | 18-Gauge | Stretched lobes or cartilage | Chunky Curb Chain |
According to the Association of Professional Piercers (APP), wearing jewelry that creates excessive friction in the fistula can lead to hypertrophic scarring. Always verify the millimeter thickness of the chain before purchasing, especially if you have tight piercings.
Pro Styling Techniques for Face Shapes
The magic of gold threader earrings lies in their adjustable length. By altering the ratio of chain in front of the ear versus behind the ear, you can tailor the silhouette to your face shape.
Stylist Pro-Tip: For a balanced look, the drop charm should never sit lower than the jawline. If the chain is too long, loop the back end through the front chain once to create a secure, shortened double-strand effect.
- Round Faces: Pull the chain to create a longer, 2-inch drop in the front. The elongated vertical line helps visually lengthen the face and draw the eye downward.
- Oval Faces: You can wear any length. A symmetrical 1-inch drop on both the front and back creates a beautiful, balanced halo effect around the lobe.
- Multiple Piercings: Use threaders in your upper lobe piercings, letting the chain cascade down over the jewelry in your lower piercings. This creates a curated, layered look without the bulk of multiple heavy dangles.

How to Secure Threaders So You Never Lose Them
The primary complaint regarding threaders is that they slip out when brushing hair or removing clothing. Because there is no traditional backing, you must create artificial tension. Here are the three most effective methods:
- Silicone Slit Discs: Do not use standard bullet earring backs; the hole is too small for a chain. Instead, purchase flat silicone discs with a narrow slit designed specifically for threaders. Slide the disc up the back of the chain until it rests flush against the earlobe.
- The Double-Loop Method: If you lack stoppers, pull the back chain up and loop it over the front chain, pulling it tight against the back of the ear. This creates a temporary knot that drastically increases friction.
- O-Ring Stoppers: Tiny, clear rubber O-rings (often sold for body jewelry) can be stretched over the pilot tip once it exits the back of the ear, acting as a lightweight, invisible clutch.
Cleaning and Maintenance to Prevent Snags
Gold threader chains are highly susceptible to kinking and snagging. A kinked chain will not pull smoothly through a piercing and can cause severe irritation.
To clean your threaders, avoid ultrasonic cleaners if the drop features porous gemstones like pearls or opals. Instead, use a soft-bristled baby toothbrush and a few drops of mild dish soap in warm water. The Gemological Institute of America (GIA) recommends this gentle approach for maintaining the luster of gold alloys without damaging delicate chain links.
Crucial Care Rule: Always remove gold threader earrings before sleeping. The friction against a cotton pillowcase is the number one cause of threader chain breakage and lost jewelry. Store them hanging from a dedicated jewelry stand or laid perfectly flat in a lined box to prevent the chains from tangling with other pieces.


