How to Layer a Gold Star Necklace: A Step-by-Step Guide
Master the art of layering a gold star necklace with our step-by-step guide. Learn chain lengths, karat pairings, and clasp tricks for a flawless stack.


The Anatomy of a Perfect Necklace Stack
The gold star necklace has transcended its Y2K nostalgia roots to become a cornerstone of modern, sophisticated jewelry wardrobes. However, wearing a single delicate pendant often leaves a look feeling unfinished. The secret to elevating this celestial motif lies in strategic layering. In 2026, the trend has shifted away from haphazard, heavy stacking toward curated, intentional arrangements that highlight the star pendant without drowning it out. A successful stack relies on visual hierarchy, weight distribution, and metallurgical compatibility. This step-by-step guide will walk you through the exact measurements, chain gauges, and mechanics required to build a flawless, tangle-free necklace stack.
Step 1: Choose Your Anchor (The Gold Star Necklace)
Your gold star necklace serves as the focal point of the stack, meaning it dictates the length and weight of every subsequent chain. Before adding complementary pieces, you must evaluate the anchor chain's durability and the pendant's proportions.
Karat Selection and Friction Resistance
When layering, chains constantly rub against one another, creating micro-friction that can wear down softer metals. According to the Gemological Institute of America (GIA), 14k gold contains 58.3% pure gold mixed with strengthening alloys like copper, silver, and zinc. This makes 14k gold significantly more resistant to friction-induced thinning than 18k or 24k gold. For an anchor chain that will endure daily stacking, 14k solid gold is the optimal choice. A high-quality 14k solid gold star pendant typically ranges from $180 to $450 depending on the millimeter width and diamond accents, while gold vermeil alternatives sit in the $60 to $90 range but will eventually wear down to the brass or silver base when subjected to stack friction.
Sizing the Star Motif and Gauge
For the anchor chain holding your gold star necklace, opt for a 1.2mm to 1.5mm gauge. Anything thinner (like a 0.8mm micro-cable) risks snapping under the friction of a multi-chain stack. The star pendant itself should measure between 7mm and 12mm in diameter. Stars larger than 15mm tend to look costume-like when layered, while stars smaller than 5mm get visually lost against thicker complementary chains.
Step 2: Select Complementary Chains (Length and Texture)
Texture contrast prevents chains from blending into a single metallic blur. If your gold star necklace is on a standard cable chain, your secondary and tertiary chains must feature distinctly different link structures to create depth.
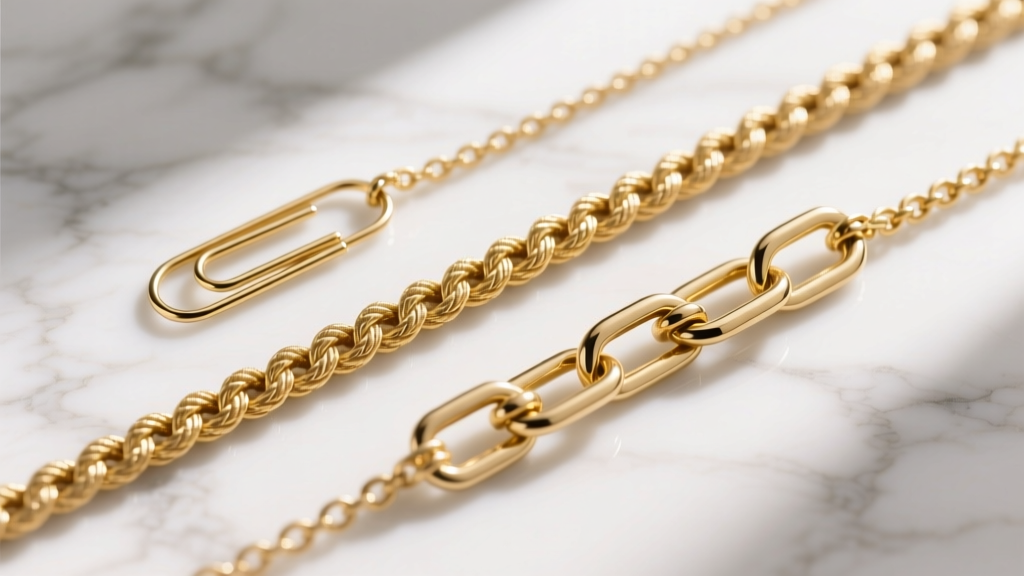
| Chain Type | Link Structure | Best Position in Stack | Friction Risk |
|---|---|---|---|
| Cable | Uniform oval links | Base / Anchor | Low |
| Box | Square geometric links | Base / Anchor | Very Low (smooth surface) |
| Paperclip | Elongated rectangular links | Middle layer | Medium (can catch on star points) |
| Rope | Twisted helix links | Outer / Longest layer | High (grabs loose hairs and pendants) |
| Beaded | Spherical metal beads | Top / Choker layer | Low |
Failure Mode: The Pendulum Effect. If your star pendant is too heavy for the chain gauge, it will constantly flip upside down. Solution: Use a chain with a slight texture, like a beaded or box chain, which provides enough micro-friction against the skin and clothing to keep the bail centered.
Step 3: Mind the Gap (Spacing Rules)
The most common mistake in necklace layering is inadequate spacing, which leads to immediate tangling and visual clutter. The golden rule of stacking is maintaining a precise gap between the resting points of each chain.
- The 1.5 to 2-Inch Rule: Each subsequent chain should be exactly 1.5 to 2 inches longer than the one above it. If your gold star necklace sits at 16 inches, the next chain must be 17.5 or 18 inches, and the third should be 20 inches.
- The Collarbone Check: The anchor chain should rest just below the hollow of the throat (usually 15-16 inches). The middle chain should graze the collarbone, and the longest chain should fall on the upper sternum.
- Pendant Clearance: Ensure the star pendant does not physically overlap with the links of the chain below it. If your star is 12mm, add an extra 0.5 inches to your spacing calculation to prevent the metal edges from scratching adjacent chains.
Step 4: Clasp Management and Tangle Prevention
Tangling rarely happens while wearing the jewelry; it occurs during storage and movement. Upgrading your hardware is a crucial step in maintaining a pristine stack.
- Standardize Your Clasps: Replace fragile spring-ring clasps with 5mm or 7mm lobster clasps. Lobster clasps are easier to manipulate when putting on multiple layers and are less likely to accidentally unhook when caught on a sweater.
- Silicone Stoppers: For chains that feature adjustable sliding beads or extenders, use micro-silicone stoppers at the ends of the chains. This prevents the excess tail of the chain from whipping around and wrapping around your gold star pendant.
- Weight Balancing: If your longest chain is a heavy paperclip or rope style, add a small 3mm gold bead to the back of the neck (near the clasp). This acts as a counterweight, preventing the heavy front links from pulling the delicate star necklace forward and choking the neckline.
Troubleshooting Common Layering Fails
Even with perfect spacing, environmental factors and daily wear can disrupt your stack. Here is how to troubleshoot the most frequent issues.
The Dreaded Chain Knot
When fine chains tangle, the instinct is to pull them apart. This is a critical error. Jewelers of America recommends using a lubricant and a fine tool to loosen the links without warping the gold.
Pro Tip: Never pull a tight knot from both ends. This compresses the gold links and can permanently warp the chain structure. Instead, lay the tangle flat on a hard surface, apply a single drop of baby oil or mineral oil to the center of the knot, and use a sterilized sewing needle to gently tease the links outward from the center.

Neckline Clashing
A perfectly layered gold star necklace can look chaotic if paired with the wrong clothing. For crew necks and high collars, shorten the stack to two chains (15" and 17") to keep the jewelry framed tightly around the neck. For V-necks and deep scoop necks, utilize the full three-chain stack (16", 18", 20") to mirror the angular geometry of the garment. Avoid layering star pendants over busy, patterned fabrics; the intricate points of the star will visually vibrate against complex prints, causing eye strain and diminishing the jewelry's impact.
Final Polish: Storage and Maintenance
To preserve the integrity of your stack, never store layered necklaces draped over a standard jewelry bust or tossed into a drawer. The varying weights of the chains will cause them to stretch and knot overnight. Instead, unclasp the chains and lay them flat in a multi-compartment velvet tray, or hang them individually on a multi-hook stand with at least two inches of horizontal space between each hook. By respecting the metallurgy, spacing, and mechanics of your jewelry, your gold star necklace stack will remain a brilliant, tangle-free focal point of your personal style for years to come.


