How to Read Jewelry Marks for Gold: A Step-by-Step Guide
Learn how to identify and verify jewelry marks for gold with our step-by-step guide. Decode karat stamps, maker's marks, and spot fakes.

Why Understanding Jewelry Marks for Gold Matters
Whether you are inheriting a vintage piece, shopping at an estate sale, or simply verifying your own collection, knowing how to read jewelry marks for gold is an essential skill. In an era where sophisticated counterfeits and misleading electroplated alloys flood the secondary market, these microscopic stamps are your first line of defense. According to the Federal Trade Commission (FTC) Jewelry Guides, manufacturers are legally required to stamp gold items with their purity, but the reality of global sourcing and antique wear means these marks can be confusing, worn away, or intentionally deceptive.
This step-by-step guide will teach you how to locate, decode, and verify the hallmarks on your gold jewelry, moving beyond basic karat numbers to understand the full story your jewelry is trying to tell.
The Anatomy of Gold Hallmarks
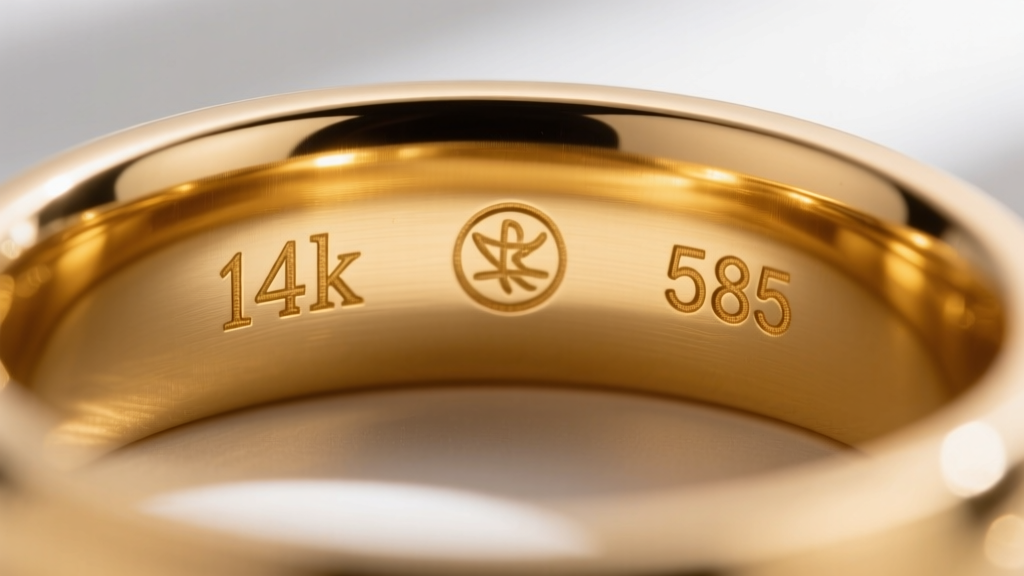
Before you grab your magnifying glass, you need to know what you are looking for. Authentic gold jewelry typically features up to three distinct types of marks, often clustered together on the inside of a ring shank or near a clasp.
1. Purity Marks (The Standard)
The most common of all jewelry marks for gold indicates the ratio of pure gold to alloy metals. In the United States, this is usually expressed in karats (e.g., 10k, 14k, 18k). In Europe and Asia, you will more frequently encounter the millesimal fineness system, which denotes parts per thousand (e.g., 417, 585, 750).
2. Maker’s Marks & Trademarks
A maker's mark is the signature of the manufacturing company or individual artisan. In the US, the FTC mandates that if a purity mark is present, a registered maker's trademark must also be stamped nearby to ensure accountability. These can be initials, a logo, or a unique symbol.
3. Assay & Origin Marks
Common in the UK and parts of Europe, assay marks guarantee that an independent, government-backed testing house has verified the metal's purity. For example, a leopard’s head indicates the London Assay Office, while an anchor denotes Birmingham. French gold jewelry often features an eagle’s head for 18k gold or a dog’s head for imported gold pieces.
Step-by-Step: How to Locate and Read the Stamps
Finding these microscopic engravings requires the right environment and tools. Follow this systematic approach to inspect your pieces.
Step 1: Gather Your Inspection Tools
- A Jeweler’s Loupe: Skip the cheap plastic magnifiers. Invest in a 10x or 20x triplet loupe. A triplet lens uses three fused glass elements to eliminate edge distortion and chromatic aberration, which is critical when reading tiny, worn stamps.
- Proper Lighting: Use a bright, cool-white LED desk lamp. Angled, directional lighting creates shadows inside the stamp indentations, making them pop against the metal.
- Microfiber Cloth: Oils and lotions can obscure shallow stamps. Always wipe the inspection area clean first.
Step 2: Target the High-Probability Zones
Jewelers place marks where they are least visible during wear but accessible for appraisal. Check these specific areas:
- Rings: The inner curve of the shank, usually opposite the setting.
- Necklaces & Bracelets: The flat tag attached to the clasp, or directly stamped onto the back of the lobster or spring-ring clasp.
- Earrings: The post itself (near the base) or the flat back of the clutch or friction back.
- Pins & Brooches: The reverse side of the pin stem or the clasp catch.
Step 3: Angle and Focus
Hold the loupe directly against your eye, then bring the jewelry toward the lens until the stamp comes into sharp focus. Tilt the piece slowly to catch the light across the engraving.

Decoding the Numbers: Karat & Millesimal Conversion Chart
When you successfully locate the purity mark, you need to translate it. The Gemological Institute of America (GIA) notes that global markets use different standards. Use this reference table to decode the most common jewelry marks for gold.
| Karat Mark | Millesimal Stamp | Gold Purity % | Common Alloy & Color Notes |
|---|---|---|---|
| 10k / 10kt | 417 | 41.7% | High copper/zinc. Very durable, common in US class rings. |
| 14k / 14kt | 585 | 58.5% | The US standard. Excellent balance of color and scratch resistance. |
| 18k / 18kt | 750 | 75.0% | Rich yellow hue. Prone to scratching. Standard for fine European jewelry. |
| 22k / 22kt | 916 | 91.6% | Very soft, deep orange-yellow. Prevalent in Indian and Middle Eastern markets. |
| 24k | 999 | 99.9% | Pure gold. Too soft for stone settings. Used in investment bullion and traditional Asian wedding jewelry. |
Red Flags: Spotting Fake or Misleading Gold Marks
Not all stamps indicate solid gold. Manufacturers of gold-plated and gold-filled items often use stamps that mimic solid gold marks, hoping to confuse the untrained eye. If you see a karat number followed by any of these abbreviations, the piece is not solid gold:
- GP / GEP: Gold Plated or Gold Electroplated. A microscopic layer of gold over a base metal like brass.
- HGE / HGP: Heavy Gold Electroplate. Thicker than standard plating, but still contains negligible melt-value gold.
- GF: Gold Filled. A thicker mechanical bond of gold (usually 12k or 14k) over brass. While durable, it is not solid gold.
- Vermeil: Gold plating over sterling silver. Often marked with a '925' silver stamp alongside a gold maker's mark, which can confuse novices.
Expert Warning: Counterfeiters frequently stamp base metal chains with '18k' or '750'. If a heavy, thick chain bears an 18k stamp but is priced suspiciously low, or if the stamp looks perfectly laser-etched while the clasp shows modern casting seams on a supposedly 'vintage' piece, proceed with extreme caution.
When Marks Are Missing or Unreadable: Next Steps
What happens when you find no marks at all? Antique pieces from the 19th century often lost their stamps after decades of resizing and polishing. Furthermore, custom-made pieces by independent bench jewelers may lack official trademarks. In these scenarios, visual inspection of jewelry marks for gold is insufficient. You must pivot to physical testing.
1. The Magnet Test (The First Filter)
Gold is diamagnetic. If your piece is strongly attracted to a rare-earth neodymium magnet, it contains ferrous metals (like iron or steel) and is not solid gold. Note: Some counterfeit chains use brass or copper, which are also non-magnetic, so passing this test is necessary but not conclusive.
2. Electronic Gold Testers
Devices that measure electrical conductivity can differentiate between 10k, 14k, and 18k gold without damaging the piece. However, they can be fooled by heavy gold plating over silver.
3. XRF (X-Ray Fluorescence) Spectrometry
For high-value items, seek out a jeweler or pawn shop equipped with an XRF analyzer. This machine shoots X-rays into the metal and reads the elemental emission spectrum, providing an exact breakdown of gold, silver, copper, and zinc percentages in seconds, completely non-destructively.
Final Thoughts on Gold Verification
Mastering the ability to read jewelry marks for gold transforms you from a passive buyer into an informed collector. While stamps are the historical record of a piece's origin and purity, they are only the beginning of the authentication process. Always pair your loupe inspections with a healthy dose of skepticism, and when in doubt, rely on professional metallurgical testing to protect your investment.


